10 Steps to Create the Perfect Language Arts Focus Wall

I’m sure you’re wondering, can I really have the perfect Language Arts Focus Wall in just 10 steps?
Having a Language Arts Focus Wall in K-6th is crucial to provide students with a tool that brings all of the selection (story) parts together in a cohesive way.
As we delve into these 10 steps, let me give you some background information. Most of my career was in California.
In the district where I taught, we used publishers that used the term “selection” to discuss the story in the “anthology” – or the reading book.
The reading books were usually formatted with a Unit
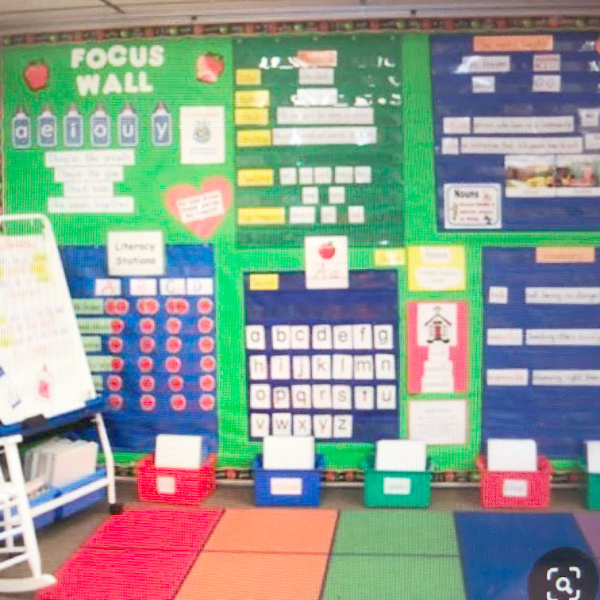
So without further ado, here are the ten steps for creating a Language Arts Focus Wall. Below is a photo of a Kindergarten Focus Wall. Kinder walls are slightly different than first through sixth grades.

**
- Choose a Background Color or Pattern.
- Create the Headers for each Theme in the Anthology
- Create Title and Genre pin-ups for each selection. (you can do this as you go for each theme).
- Add Selection Vocabulary
- Add Weekly Spelling Words
- Determine and Post the Focus Question
- Create posters for the Grammar Skill for that Lesson
- Create posters for the Comprehension Skill
- Decide how you want to include the Story E
lements - PUT IT ALL TOGETHER!
Now mind you, this format is for First grade – sixth grade. For Kindergarten it would be changed up to include the letter that you are focusing on. And in the First grade, you would add the spelling vowel pattern being taught.
Let’s look at each step for a language arts focus wall.
Step #1 – Background color
First, the background color. I was careful to select a background color that I would be able to live with for the entire year. Of course, you could change it mid-year, but I never seemed to have the time or desire to do that. So, I typically chose a color that would look ok throughout the entire school year. Some teachers today are using burlap to create bulletin boards. I think they look great. Some colors that I used frequently were yellow and blue (two of my favorites) but green works well also. I would avoid red since studies have shown that red is a harsh, aggressive color overall.
Some teachers create a theme for their board using whimsical characters or other such items.
You may be interested in a FREE checklist I have created for Classroom Routines. You can get it by filling out the form below.
**
Step #2 – Create Unit/Theme Header
Next, you will be creating the headers for the units from the Anthology.
I have seen this part done in a variety of ways. Some teachers list the entire information of each selection (usually a week to ten days) on a separate poster or chart. Other teachers list each item separately on sentence strips and use pocket charts to display them. You can also use adorable letters to write the theme header. Others list each item separately on copy paper with little graphics.
Personally, I used sentence strips. But since I didn’t possess enough pocket charts for this, I just stapled them onto the board each unit/theme change.
I would suggest looking at the variety of ways by going to either Pinterest or Google to look at how other teachers do it. With today’s technology, there are a number of ways to create these headers quickly.
Step #3. Create the “Story Map” section
Create title and selection genre items to post. Some publishers and teachers call this the “Story Map.” Basically, it is the story title, the genre, main characters, setting, problem, and solution.
I’ve seen these also on sentence strips in pocket charts, and also on posters or large construction paper.
I would definitely have the item (for example “setting” listed in a different font or color of marker from the one that goes with the selection.
Some teachers make these story elements permanent by making them laminated, then all they need to change out is the specific words that go with that particular selection.
Of course you will be using this focus wall as an instructional tool, reviewing it each morning as you begin the Language Arts period. You might also be interested in reading another article I wrote about instructional practices.
7 Highly Effective Instructional Practices to Increase Student Engagement & Impress Your Principal.
Step #4 – Selection Vocabulary
Add the selection vocabulary. I found that the vocabulary words and spelling words work well in pocket charts, but if you don’t have any, you can again write them quickly on construction paper or print them out from the computer.
When I taught 3rd grade I wanted students to learn to read and write in cursive, so I would list the vocabulary in both printed words and in cursive, side-by-side.
Step #5 – Spelling Words
Add weekly spelling words. In the primary grade in particular, most spelling lists follow a vowel pattern or some other spelling pattern, like consonant blends, etc.
You can list the pattern at the top of the list of spelling words, or just discuss it with the students.
Step #6 – The Focus Question(s)
The focus question is tied to the selection. You will usually find it in the Teacher’s Edition for that story.
A really simple way to post this is to just type it in large font on a piece white paper and center it on a piece of construction paper or scrapbooking paper to center it; then staple it under the title “FOCUS QUESTION.”
Step #7 – The Grammar Skill
This is where you determine the grammar skill that is being taught in this selection. Look through the TE and figure out what is the main GRAMMAR SKILL being taught.
If the selection lists more than one, my suggestion is to choose the one that you feel is the most important so that you can highlight it. Of course, you will teach them all, but the one you choose will be discussed more often during that week (or 10 days).
Step #8 – The Comprehension Skill
The comprehension skill is similar to the Grammar Skill in that you will need to go to the Teacher’s Edition to find out what is highlighted. Again, if there if more than one I suggest you select which one you think is the most important.
Of course you will teach all of them, just like with the grammar skill.
This explanation just reminded me of a meme I saw recently online. It said something like, “Don’t keep saying they never taught you that in school. We did, you were just talking and not paying attention.” I thought it was so funny.

Step #9 – The Story Elements
The story elements are more necessary and more detailed in upper elementary. They include the items listed earlier under “story map.” (Step #3) plus more detailed items.
For Kindergarten and First Grade you will not need to include this item.
Basically, these elements go beyond the setting and characters into elements such as theme, tone, conflict, resolution, point of view. Can you now see why this is more in tune with upper elementary?
Step #10 – PUT IT ALL TOGETHER
The last step is to put them all together in a pleasing presentation. If you are a beginning teacher, or if your district just purchased a new Reading Series, you will be creating all of this.
Think it over for a bit and look online (like I mentioned earlier). There are some elements that you will leave up all year, like the words “TITLE, GENRE, UNIT, etc. For these you might want to make something that can be laminated.
Decide which parts (if any) that you will put in pocket charts. There are some pluses to pocket charts, but they aren’t crucial.
I would suggest that you get everything ready one theme at a time. That way if you change your mind on how you want a certain part to look, you will only need to re-do a few units.
I hope you found this guide helpful. Let me know what other topics you are interested in or have questions about. I’m here to help.
Until Next Time,
Your Teacher Buddy Dawn


